Adding Twitter to your site with jQuery Part 2
As a special bonus for all four of you who will read this post, i’ve also built this into a jQuery plugin. First we will start by changing what we did in the last post a bit by creating a unordered list to hold the tweets.
	var $tweetContainer = $(document.createElement("ul"))
                                         .attr("id","tweet-cont")
       					.addClass("tweet-cont");
	base.$el.append($tweetContainer);
We will use each list item to hold the tweet data. I added an if statement that will add a class to easily style even and odd tweets, and then we add the code to include the users Twitter avatar and the tweet text.
	var tweetClass = "odd";
	if(i%2 == 0){
		tweetClass = "even";
	}

     var $tweet = $(document.createElement("li"))
                  .attr("id","tweet_"+tweets[i].id)
                  .addClass(tweetClass)
                  .addClass("tweet");
     $tweetContainer.append($tweet);

     var $tweetPhoto = $(document.createElement("img"))
                  	 	.addClass("avatar")
                  	 	.attr("src",tweets[i].profile_image_url);
     $tweet.append($tweetPhoto);

     var $tweetDesc = $(document.createElement("div"))
                  	 	.addClass("text")
                  	 	.html(""+tweets[i].from_user+": " + base.replaceURLs(tweets[i].text));
     $tweet.append($tweetDesc);
You’ll notice there’s a function in there called replaceURLs:
	base.replaceURLs = function(text){
		text = text.replace(base.options.aTagRegexp,"$1");
		text = text.replace(base.options.userRegexp,"$1@$2");
		text = text.replace(base.options.hashtagRegexp,"$1#$2");
		return text;
	}
This function will search through the text of the tweet and take urls and make them clickable, as well as finding twitter users and hash tags and linking those correctly as well.
Now we need to display when the tweet was created. That should be too bad right, we just create an element and use it to display the date. Normally when working with dates i’d say that was OK, except twitter is all about instant gratification. We want to know what’s happening and how long ago it was when it happened. Its for this reason we need a little extra code so we can display when a tweet was created in relation to the current time.
First we need to get some values to compare the tweets created date against:
	var minDiff = Math.ceil((today.getTime()-tweetDate.getTime())/(60*1000));
	var hourDiff = Math.ceil((today.getTime()-tweetDate.getTime())/(60*60*1000));
    	var dayDiff = Math.ceil((today.getTime()-tweetDate.getTime())/(24*60*60*1000));
Then all we need to do is write our compare logic. The seconds and minutes are obvious choices, but choosing when to stop displaying a message like “2 days ago” vs displaying the tweet date is up to you. For the plugin I went with 5 days. We will also be providing a link to the app used to post the tweet, very helpful considering there are about 800,000 different apps out there.
	if(minDiff < 59){
		timeDiff = "about "+minDiff+" minutes ago from "+base.fixEncHTML(tweets[i].source)+"";
     }else if(hourDiff < 24){
         timeDiff = "about "+hourDiff+" hours ago from "+base.fixEncHTML(tweets[i].source)+"";
     }else if(dayDiff < 5){
         timeDiff = ""+dayDiff+" days ago from "+base.fixEncHTML(tweets[i].source)+"";
     }else{
         var AMPM = "PM";
         var myHours;
         if(tweetDate.getHours() < 12){
         		AMPM = "AM";
          	if(tweetDate.getHours() == 0){
                  	 myHours = "12";
              }else{
              	myHours = tweetDate.getHours();
              }
         }else{
         		myHours = tweetDate.getHours()-12;
         }

         var myDate = tweetDate.getDate() +"th";
         if(tweetDate.getDate() == 1 || tweetDate.getDate() == 21 || tweetDate.getDate() == 31){
         		myDate = tweetDate.getDate() +"st";
         }else if(tweetDate.getDate() == 2 || tweetDate.getDate() == 22){
         		myDate = tweetDate.getDate() +"nd";
         }else if(tweetDate.getDate() == 3 || tweetDate.getDate() == 23){
         		myDate = tweetDate.getDate() +"rd";
  		}
         timeDiff = ""+myHours+":"+tweetDate.getMinutes()+" "+AMPM+" "+base.months[tweetDate.getMonth()]+" "+myDate+" from "+base.fixEncHTML(tweets[i].source)+"";
	}
Finally, we can add a couple useful links that will help users view and reply to the tweets:
	var $tweetLinks = $(document.createElement("div"))
					.addClass("links")
                  	 	.html("Reply · View Tweet");

	$tweet.append($tweetLinks);
Thats all it takes to write out a tweet, al this code will get you something that looks like this (i know, the colors are awful):
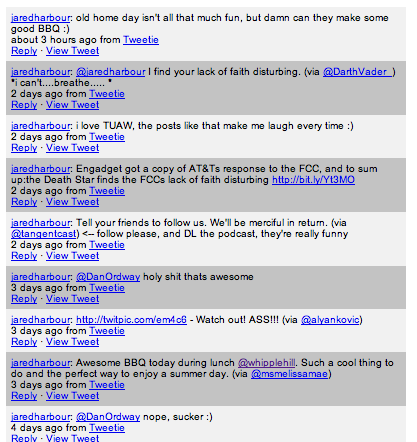
That was a bunch of code. I hope you enjoyed this series of posts, and I promise if I ever do a series of posts again i’ll write them all first before posting :-)
Check out this quick demo and of course, the plugin source code.
Thanks for the second part, even if it is for only 4 of us. We were working on a solution when I found your first post and our solution works well, but I like how you display how long ago the post was and how you make things clickable. Only thing left is how to tweet directly from your site without redirecting to twitter… ?
I know thats doable, but you’d need to get into the twitter api vs the search api. I haven’t gotten to deep into that yet, but if I find the time i’ll throw something together and post it.
That demo link 404s
Sorry about the 404, I moved my site to new hosting account and forgot to upload this :(